September
29

September
18
OpenWRT on TD-W8970B v1
Initial installation
Part #1 Enable root access
https://wiki.openwrt.org/toh/tp-link/td-w8970
Steps to access the linux shell using telnet for the TD-W8970 v1 firmware version0.6.0 2.12 v000c.0 Build 140613 Rel.31066n. Without opening the router physically.
-
Login to the router web ui at 192.168.1.1. Take backup of the router configuration conf.bin(Keep one copy safely incase you screw up things!)
-
download tplink configuration encrypter/decrypter tool from the link below. http://ejs1920.users.sourceforge.net/StatPOSTer-20160306.jar (Thanks ejs1920 for making this tool)
-
Launch the program StatPOSTer-20160306.jar
-
Select the router as TD-w8970v1 and click on decrypt button in the program and select the config file you saved in the step1
-
Save the decrypted conf.xml
-
Open the the decrypted conf.xml in notepad(would suggest to keep backup of this file just in case)
-
Add the xml tag after the xml node SerialNumber and save it.
<Description val="TD-W8970 v1`telnetd -p 1023 -l login`" /> -
Click the encrypt button, select the modified config, save as conf_modified.bin
-
Login to the router web ui at 192.168.1.1 and upload the new conf_modified.bin. And let the router reboot.
-
Router will reboot and have TD-W8970 v1`telnetd -p 1023 -l login` at the top, this is expected.
-
Telnet to (using putty or something like it) 192.168.1.1 at port 1023
-
Enter the user name as admin and password as 1234 (Looks like some sort of backdoor, there goes my peace of mind!)
-
You are ready to go and have access to linux shell.
Part #2 Install OpenWRT
https://forum.openwrt.org/viewtopic.php?pid=340785#p340785
(Filenames do not much, so download the firmware and rename it )
How to backup original firmware and install openwrt without opening the case
You will need:
1) a usb stick/thumb drive formatted as vfat/msdos
2) PC connected to TD-W8970 v 1 running original firmware either by wire or wireless
3) Telent and dd installed on the PC
Prepare the openwrt images on PC
Download the official 15.05 relese of openwrt-lantiq-xrx200-TDW8970-sysupgrade.image and run the following commnad:
dd if=openwrt-lantiq-xrx200-TDW8970-sysupgrade.image bs=1310720 skip=1 of=openwrt-lantiq-xrx200-TDW8970-sysupgrade-1.imageCreate folder td-w8970 on your usb stick/thumb drive then copy these two files over the newly created folder. Unmount/eject the usb stick and plug it into the usb port on the back of TD-W8970.
Backup the original firmware
Open telnet and connect to 192.168.1.1 with login/password both as admin. Type sh after logging successfully. Run the following command to backup:
cat /dev/mtd0 > /var/usbdisk/sda1/td-w8970/mtd0
cat /dev/mtd1 > /var/usbdisk/sda1/td-w8970/mtd1
cat /dev/mtd2 > /var/usbdisk/sda1/td-w8970/mtd2
cat /dev/mtd3 > /var/usbdisk/sda1/td-w8970/mtd3
cat /dev/mtd4 > /var/usbdisk/sda1/td-w8970/mtd4
cat /dev/mtd5 > /var/usbdisk/sda1/td-w8970/mtd5
cat /dev/mtd6 > /var/usbdisk/sda1/td-w8970/mtd6
Verify the size of mtd1 file on the usb stick by executing the following command:
ls -l /var/usbdisk/sda1/td-w8970/mtd1If the size is 1310720 you can go ahead with installing openwrt otherwise go back to “Prepare the openwrt images on PC” and replace 1310720 by the actual size in the dd command.
Install openwrt
Run the following command
cat /var/usbdisk/sda1/td-w8970/openwrt-lantiq-xrx200-TDW8970-sysupgrade.image > /dev/mtdblock1
cat /var/usbdisk/sda1/td-w8970/openwrt-lantiq-xrx200-TDW8970-sysupgrade-1.image > /dev/mtdblock2
Reboot router afterwards.
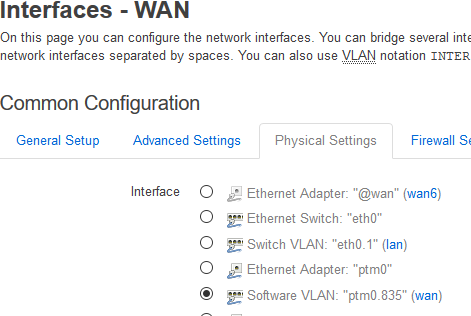
On some ISPs (ex Greek Wind) you need to change the PPPoE dial interface from pto0 to pto0.835,
as 835 is the deault VLAN that Wind is using.
April
6
HP DV7 Series BIOS and PCID
If you come across a corrupted BIOS or a bad flash of an HP DV4/5/6/7, you may see the error System Board (00A)
Usually you can fix it with the HP DMI Tools from HP (HPBQ138.exe) , but in some cases the PCID is not 25 chars but 17. This come with the error below…
The input PCID is invalid
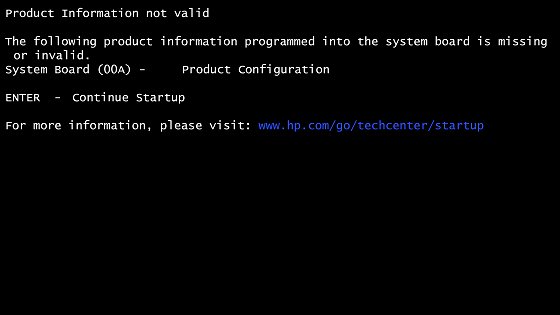
The tools here are the old versions which allows to edit the DMI to 17 chars
P.S. You will need a MS/Free/Mini-DOS bootable USB disk, and then copy the files
to the flash drive.
HP reference documentation
HP Consumer Notebook EEPROM utility
May
21
Open-WRT and TP-Link Wi-Fi issues
April
11
How to patch CVE-2014-0160 on Open-WRT (12.09)
February
22
Grep a log file and send output to mail
This is a small script that looks for a string in a log file and then the string is found, sents by mail the output
-This example is for Smoothwall, in which i run Guardian Active response and i wanted to know who is blocked
-Place it in your rc.local, reboot and check your mailbox
#!/bin/bash
EMAILADDRESS="root@localhost"
EMAILSUBJECT="Guardian On Firewall "
MESSAGEBODY="/tmp/alert.txt"

##Select you log file
#tail -f /var/log/messages | while read LINE
tail -f /var/log/guardian/guardian.log | while read LINE
do
#Select the string
if [ `echo $LINE | grep -c "blocked"` -gt 0 ]
# if [ `echo $LINE | grep -c "eth"` -gt 0 ]

then
echo "Guardian actions:" > $MESSAGEBODY
#Insert some text before the output
echo $LINE >> $MESSAGEBODY
# echo "Guardian done it again !" >> $MESSAGEBODY
#Here i use sendEmail from Smoothwall, you can use you own sendmail/mail commands
sendEmail -f -u "$EMAILSUBJECT" -t -s smtp.gmail.com:587 -xu [email protected] -xp password < $MESSAGEBODY
# fi
done
February
20
Fail2Ban and Zimbra
After following several guides i faced an issue with the mail reporting.
Since sendmail provided by zimbra doesn’t work with the same parameters like the default sendmail i modified the mail function of Fail2Ban.
– I have enabled only notifications for Webmail/Webadmin login attemps
For Red Hat /CentOS you will need EPEL Repo
rpm -Uvh http://dl.fedoraproject.org/pub/epel/6/x86_64/epel-release-6-8.noarch.rpm
February
18
OpenVPN Site-to-Site
This is a small how-to for OpenWRTs running OpenVPN and connecting them by creating a site-to-site VPN tunnel.
-We assign 2 IPs, one for each tun0 interface on each router
-This guide assumes that you have already install openvpn packages on both devices
-In this guide A router has 192.168.10.x network and 192.168.251.1 IP in tun0 interface, and router B has 192.168.22.x network with 192.168.251.2 IP in tun0 interface.
-You will need the file /etc/openvpn/static.key or generate a new one in one router and copy it to the other.
-Port 1195-1194 can be changed
-You can have multiple blocks of configuration in OpenVPN, one for Road Warriors (see here) and the one documented here.
-Follow the guide here for installing Open VPN and configuring the interfaces tun0/tun1 etc
Router A
config 'openvpn' 'site-to-site'
        option 'enable' '1'
        option 'port' '1195'
        option 'proto' 'udp'
        option 'dev' 'tun'
        option 'secret' '/etc/openvpn/static.key'
        option 'ifconfig' '192.168.251.1 192.168.251.2' #this device tun0 / remote device tun0
        option 'keepalive' '10 120'
        option 'comp_lzo' '1'
        option 'verb' '10'
        option 'float' '1'
        option 'local' '192.168.10.1 1195'
        option 'remote' 'remote.host.name 1194'
Add to /etc/firewall.user
iptables -t nat -A prerouting_wan -p udp --dport 1195 -j ACCEPT
iptables -A input_wan -p udp --dport 1195 -j ACCEPT

iptables -I INPUT -i tun+ -j ACCEPT
iptables -I FORWARD -i tun+ -j ACCEPT
iptables -I OUTPUT -o tun+ -j ACCEPT
iptables -I FORWARD -o tun+ -j ACCEPT
Add a static route between the 2 LANs
route add -net netmask 255.255.255.0 gw 192.168.251.2
Router B
config 'openvpn' 'Site-to-site2'
	option 'enabled' '1'
	option 'dev' 'tun'
	option 'ifconfig' '192.168.251.2 192.168.251.1'#this device tun0 / remote device tun0
	option 'secret' '/etc/openvpn/remote.key'
	option 'keepalive' '10 120'
        option 'comp_lzo' '1'
        option 'persist_key' '1'
        option 'persist_tun' '1'
        option 'verb' '3'
Add to /etc/firewall.user
iptables -t nat -A prerouting_wan -p udp --dport 1194 -j ACCEPT
iptables -A input_wan -p udp --dport 1194 -j ACCEPT

iptables -I INPUT -i tun+ -j ACCEPT
iptables -I FORWARD -i tun+ -j ACCEPT
iptables -I OUTPUT -o tun+ -j ACCEPT
iptables -I FORWARD -o tun+ -j ACCEPT
Add a static route between the 2 LANs
route add -net netmask 255.255.255.0 gw 192.168.251.1
January
31
Zero config VPN setup for OpenWRT
January
27